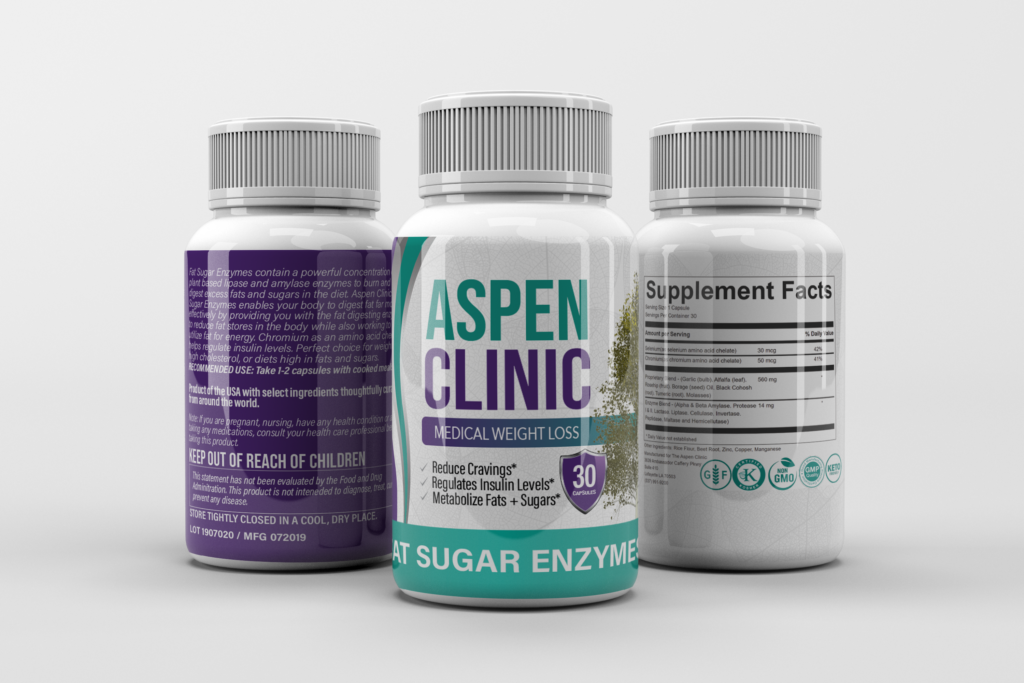
What Should I Put on My Grocery List to Lose Weight?

Schedule Appointment >

Trying to make a healthy lifestyle change by losing weight definitely has its challenges. It can be frustrating when trying to figure out what to eat and what not to eat especially when it comes to grocery shopping. There are plenty of healthy options out there but there are also options that claim to be healthy but aren’t actually that good for you. 

Luckily if you are struggling with knowing what to put on your grocery list to lose weight, the Aspen Clinic is full of resources to help you maintain a healthy diet.

Grocery Guide 

The Aspen Clinic Grocery Guides are some of the best resources to check out when it comes to making healthier choices on your next grocery shopping trip. These comprehensive guides offer the best choices for every category of food from local grocery stores such as Walmart, Target, Rouses, and Whole Foods. 

Recipes 

We also encourage you to take a look at our recipe guide online where you can find healthy recipes for breakfast, lunch, dinner, dessert, and so much more. You can even learn how to make any kind of nut milk which can also be used in other recipes as well!

Happy, Healthy Days Podcast

For additional information on healthy eating take a listen to our podcast where we go over everything from fitness, nutrition, recipes, and so much more. Happy, Healthy Days is a great resource for guidance, tips, tricks, and support for listeners on their weight loss journey.

Join The Aspen Clinic – We Have 9 Locations in Louisiana

Schedule Appointment >

The Aspen Clinic program is based on lifestyle changes, not temporary dieting. In summary, our program is designed to increase your metabolism and help you develop a new set of eating and activity habits. We will individualize your program according to your daily caloric needs to ensure that you are losing fat and avoiding the loss of lean muscle mass. 

Visit any of our Aspen Clinic locations across Louisiana, Baton Rouge, Covington, Hammond, Harvey, Houma, Lafayette, Metairie, Prairieville, and Slidell, or schedule an appointment today to get started!

How To Make Any Kind Of Nut Milk

Schedule Appointment 

Nut milk has become the new normal. It seems that everyone is looking for a healthy milk alternative, and making your own is more than ideal due to the astronomical prices of nut milks in stores! The Aspen Clinic of Louisiana is here to teach you how to make your own nut milk with the nut of your preference! 

How To Make Nut Milk

According to The Kitchn, here is how to make nut milk:

  • Buy raw nuts.
  • Soak the nuts overnight.
  • Drain and rinse the soaked nuts.
  • Blend the nuts with fresh water.
  • Strain the nut milk.
  • Sweeten, if desired.
  • Chill, drink, enjoy.
  • Wash, rinse, repeat once a week for nut milk happiness

Here are a few tips to making your nut milk as perfect as possible: 

  • Always choose raw nuts. Not only do they last longer, but they also take much better to soaking and grinding and impart a light, clean flavor.
  • Make sure the nuts are fresh and the best quality you can afford. Rancid nuts make for rancid nut milk, and since nut milk involves very minimal processing and just two ingredients, buy the best quality you can afford.
  • Avoid skins where possible. We’d never suggest that you should peel almonds or pecans, but when making cashew or hazelnut milk, you can remove their skins by soaking and rubbing them gently between clean kitchen towels. This makes for a less chalky texture and more flavor in the finished milk.

Check out one of our previous blogs on how to make your own almond milk

Schedule Appointment 

Join The Aspen Clinic – We Have 9 Locations in Louisiana

The Aspen Clinic program is based on lifestyle changes, not temporary dieting. In summary, our program is designed to increase your metabolism and help you develop a new set of eating and activity habits. We will individualize your program according to your daily caloric needs to ensure that you are losing fat and avoiding the loss of lean muscle mass. 

Visit any of our Aspen Clinic locations across Louisiana, Baton Rouge, Covington, Hammond, Harvey, Houma, Lafayette, Metairie, Prairieville, and Slidell, or schedule an appointment today to get started!

You can also visit our online store, we carry all the weight loss essentials including water bottles, vitamins / supplements, protein powders, and more!

Recipe: Grilled Salmon with Avocado Salsa

To all of our Catholic patients: We made it to the last week of Lent!  We hope you have found some new, healthy, meatless recipes, but if you are looking for something new to try this Friday we have the perfect thing for you!

For our non-Catholic patients:  We have the PERFECT thing for you, too!

If you like salmon and avocado this recipe will not disappoint!  Our favorite thing about it is that it’s completely natural and won’t spike your carbohydrate count while giving you loads of protein and healthy fats.  Not to mention, it’s Whole30 compliant, in case our last post intrigued you enough to give Whole30 a try!   It only takes about 15 minutes to make and if you make extra avocado salsa you can use it the next day as a topping on something else!

(We love it on top of Trader Joe’s Chili Lime Chicken Burgers)

Here’s the recipe:

Ingredients:

  • For the salmon:

    • 2 lbs salmon cut into 4 portions
    • 1 tsp light olive oil
    • 1 tsp salt
    • 1 tsp ground cumin
    • 1 tsp paprika powder
    • 1 tsp onion powder
    • 1/2 tsp ancho chili powder
    • 1 tsp black pepper
  • For the avocado salsa:

    • 1 avocado cubed
    • 1/2 red onion sliced or diced
    • 2 limes juiced
    • 1 tbs fresh cilantro chopped


Directions:

  • Mix the salt, chili powder, cumin, paprika, onion, and black pepper together.  Rub the salmon filets with olive oil and this seasoning mix.
  • Refrigerate for at least 30 minutes
  • Pre-heat the grill
  • Combine avocado, onion, cilantro, lime juice, and salt in a bowl and mix well.  Chill until ready to use.
  • Gill the salmon to desired doneness (at least 5 minutes)
  • Top with avocado salsa and enjoy!


Source: www.thecookierookie.com

Chocolate Pudding… Without the Guilt!

In case the avocado wasn’t already your favorite emoji and tableside appetizer, we’ve found another reason to love them! We’ve got two words for you:

Avocado. Pudding.

This rich, decadent, low-carb dessert can satisfy all of your chocolate cravings any time day or night! The best news: it’s COMPLETELY guilt-free!  Yes, avocados are high in fat, but they’re high in monounsaturated fat which is the “good fat” that helps lower bad cholesterol.

We know what you’re thinking… avocados and chocolate? But just trust us, this will be your new favorite way to kill a sweet tooth. This chocolate pudding doesn’t involve any milk, heavy whipping cream, cornstarch, or sugar that you’d find in most recipes; what makes it creamy is the avocado base. Not to mention, we used coconut milk, which makes it 100% dairy free and vegan-friendly. It can be thrown together within minutes and you can easily adjust the recipe to make more or less depending on how many servings you need.

Ingredients:

4 Avocados

4 tbsp Unsweetened Cocoa Powder

½ cup Coconut Milk

4 tbsp Stevia in the Raw

2 tsp Vanilla Extract

Directions:

Remove avocados from the skin (and pit) and place in a food processor or blender. Add in all other ingredients and blend until creamy. Scrape the sides of the blender when needed and continue to blend for 1-2 minutes. Pour into a bowl and refrigerate for about 30 minutes until chilled. Enjoy!

**Disclaimer: we won’t judge you if you lick the bowl**

Kodiak Cakes: The Protein Packed Pancake!

This one’s for you, pancake lovers!

I’m sure you thought that on a low carb, high protein diet you would never get the chance to enjoy pancakes again… lucky for you, we found Kodiak Cakes!  This LOWER carb, protein-packed pancake mix will fulfill all of your pancake/waffle cravings while providing you with loads of protein!  Kodiak Cakes are a perfect way to cheat clean!  We added an egg and some protein powder to up the protein even more.  Here’s the recipe we used:

Ingredients:

  • 1 cup mix
  • 1 cup water
  • 2 Tbsp Chocolate Dream Slim Shake
  • 1 egg

Directions:

  • Blend or whisk all ingredients in a large bowl.
  • To make waffles: cook waffles on a preheated, lightly oiled waffle iron until steam stops and waffles are cooked throughout.
  • To make pancakes: Pour 1/4 cup batter on a preheated, lightly oiled griddle at 375 degrees F, or on a skillet set at medium.  Flip flapjacks after bubbles stop forming and bottom side is golden brown (should take about one minute to cook first side, adjust accordingly).  Cook opposite side until golden brown (should take about 30 seconds).
  • Enjoy!

Kodiak Cakes vs. Hungry Jack Nutrition Facts:

Kodiak Cakes:

  • Calories: 190
  • Total Fat: 2g
  • Total Carbohydrates: 30g
    • Dietary Fiber: 5g
    • Sugar: 3g
  • Protein: 14g

Hungry Jack :

  • Calories: 225
  • Total Fat: 2.2g
  • Total Carbohydrate: 46.5g
    • Dietary Fiber: 1.5g
    • Sugars: 10.5g
  • Protein: 6g

Photo Credits: @pbnvernie on Instagram

Get more recipes from the Aspen Clinic!

Cake Batter Overnight Oatmeal

One of the main confessions that our patients make is that they skip breakfast most days of the week.  When we ask why, the most common answer is that there just isn’t enough time to prepare something healthy.

So, of course we’ve found a solution:  Make breakfast the night before!

This protein-packed oatmeal we found on dashingdish.com not only tastes AMAZING, but it’s also quick and easy for your on-the-go lifestyle!

Want more good news?  Your kids will love it too!

Ingredients:

  • 1 cup old fashioned oats
  • 1/4 cup vanilla protein powder (we used the Aspen Slim Shake!)
  • 2 Tbsp baking stevia
  • 1/8 tsp salt
  • 1/2 tsp almond extract
  • 1/4 tsp vanilla extract
  • 3/4 cup unsweetened almond or low-fat milk
  • 1/2 cup plain fat-free Greek yogurt
  • 1 Tbsp sprinkles for topping (optional)

Directions:

Mix all ingredients together in a large bowl.  Divide between 2 small bowls, mugs, or mason jars.  Cover and refrigerate overnight so that the oats soften and absorb the liquid.  Top with sprinkles in the morning and enjoy!

-If you prefer hot oats just microwave for 30-60 seconds-


 *Don’t forget our 2 and 2 rule*

Breakfast should be eaten within 2 hours of waking up and your last meal should be 2 hours before bedtime.

Recipe: Egg White Muffins

Haven’t you heard that “breakfast is the most important meal of the day”?

So many people admit to skipping breakfast due to a lack of time in the mornings to prepare anything healthy.  However, those who skip breakfast are actually decreasing their metabolism by almost 15%.

To help the breakfast skippers out there, we found this great recipe from that offers a solution to give you a breakfast that is quick, easy, and protein packed. On top of all of those awesome things, these egg white muffins are DELICIOUS! Just follow these few steps and you’ll have breakfast for the whole week!


Egg White Muffins

Instructions:

  1. Preheat oven to 350 degrees.
  2. Choose the ingredients that you would like to use and add them to each cup.  Feel free to make each cup different so every day you have something new!  (We like using ham, Canadian bacon, chesse, spinach, onions, bell peppers, and jalapenos)
  3. Add 1/3 cup liquid egg whites or 2 eggs per cup.
  4. Bake for 30 minutes.
  5. Let cool  completely and then separate the muffins into Ziploc bags with no air in them.


Each morning warm up the muffins in the microwave and ENJOY!

Use this easy, great tasting recipe to keep your mornings happy and healthy!


Sources:

hemandhersblogspot.com

Avocado Cauliflower “Toast”

Toast has been a huge breakfast staple for many people, so finding a low-carb vice to replace your favorite breakfast is extremely important. Lucky for you, we found this recipe! You’re going to want to replace all toast with this delicious, carb-free cauliflower version.

TOTAL TIME: PREP: COOK: SERVES: 2

Avocado Cauliflower Toast Recipe

Image result for cauliflower avocado toast

INGREDIENTS

  • 1/2 head cauliflower
  • 3 eggs, divided
  • kosher salt
  • extra-virgin olive oil
  • 1 avocado, peeled and pitted
  • Juice of 1 lemon
  • pinch red chili flakes

DIRECTIONS

  1. Grate cauliflower on a box grater. Transfer to a large bowl and mix with 1 egg and a large pinch of salt.
  2. In a large skillet over medium heat, heat olive oil. Add 2 big scoops of cauliflower mixture to pan and shape into a round patty. Repeat to make a second patty. Let cook until golden brown, about 5 minutes, then carefully flip. Cook 3 more minutes. Transfer to a plate.
  3. In same skillet, fry remaining 2 eggs and set aside.
  4. In a small bowl, mash avocado with lemon juice. Season with salt. Spread on top of cauliflower “toast.” Sprinkle with red chili flakes. Top each with a fried egg. Serve immediately.

Source: http://www.delish.com/cooking/recipe-ideas/recipes/a48901/avocado-cauliflower-toast-recipe/

Blackened Fish Tacos Recipe

Everyone loves to visit the beaches on the Alabama and Florida Gulf Coast a couple of times a year and there’s no shortage of fish restaurants in the area and Blackened Fish Taco Bowls are a local favorite.

Blackening fish is a cooking technique that according to the internet originated with Chef Paul Prudhomme from Louisiana. It involves dredging the food such as chicken or fish in a mixture of herbs and spices and then cooking it in butter, usually in a hot cast iron skillet. I didn’t use butter of course, just some olive oil and got the same effect.

It produces a lovely seared effect on the surface of the food that’s not burnt although it may look like that. The trick is to cook it in a medium hot cast iron skillet, if your skillet is too hot you run the risk of burning it.  Tilapia fillets are used here for the fish taco bowls but you can use any firm fleshed white fish or even shrimp for this. Optional toppings include cheese or sour cream and you can choose vegan versions if you can’t tolerate dairy, or just leave them out.

Blackened Fish Taco Bowls

Author: Noshtastic – Serves 4

Ingredients

  • 4 white fish fillets (Tilapia works well)

For Blackening Seasoning:

  • 1 tablespoon paprika
  • 1 tbsp ancho chile powder
  • ½ tsp dry mustard powder
  • ÂĽ – ½ tsp cayenne pepper
  • 2 tsp ground cumin
  • 1 tsp ground black pepper
  • 1 tsp dried oregano
  • ½ tsp salt
  • ½ tsp onion powder
  • ½ tsp garlic powder
  • 2 tbsp olive oil

For Bowl Mix:

  • red cabbage, shredded, about a handful.
  • 1 cup frozen corn, (or fresh!)
  • 1 cup black beans, drained
  • 4 salad onions, sliced
  • 1 avocado, cut into small pieces
  • 2 limes, quartered, to serve

Optional Toppings

  • Sour cream
  • Low fat shredded cheese
  • Cilantro

Instructions

Step 1: In a small bowl mix together all the spices and seasonings listed above.

Step 2: Rub the spice mix over both sides of the fish fillets

Step 3: Heat a cast iron skillet on high heat until hot and add the oil, give it a minute to heat the oil.

Step 4: Add the fish to the skillet and cook for 3-4 mins per side on a medium heat until it’s cooked through, it will be blackened on the outside, but not burnt.

Step 5: Serve in bowls with the fish and vegetables and beans on top, if you like you can add sour cream and cheese too.

Enjoy!

 
Sources:
http://www.noshtastic.com/gluten-free-blackened-fish-taco-bowls/

How to Make Almond Milk

Since 40% of the population is lactose intolerant, almond milk, and other milk alternatives, have become incredibly popular.

If you like the store bought kind, you’ll LOVE real, homemade almond milk.

Making almond milk is actually an incredibly old process.

The process essentially involves soaking almonds in water overnight or for up to two days — the longer you soak the almonds, the creamier the milk will be. Drain and rinse the beans from their soaking water and grind them with fresh water. The resulting liquid, drained from the almond meal, is almond milk.

Real, fresh, very tasty almond milk. It’s a life-changing thing.

Homemade almond milk only lasts a few days in the fridge, so make just what you think you will drink in this time period. You could heat your almond milk on the stove to pasteurize it and extend the shelf-life, but this somewhat defeats the purpose of making it yourself. The process of grinding and straining the milk only takes a few minutes, so making smaller, more frequent batches doesn’t feel too labor-intensive to me.

Start with a ratio of 1 cup almonds to 2 cups water when making almond milk. This makes a milk that is roughly the consistency of 2% milk. If you’d like a thinner milk, use more water next time; for thicker milk, use less.

It can be made in both a blender and the food processor, good results with both. Overall, the milk made in the blender ever-so-slightly better: it has a silky texture and a subtly sweet flavor. Milk made in the food processor is a bit thicker and occasionally has some grit, and it has a more pronounced nutty flavor. Visually, you can’t tell the difference at all! If you have both a blender and a food processor, try making almond milk in both to see which one you prefer.

Homemade Almond Milk

Makes about 2 cups

Ingredients

1 cup raw almonds, preferably organic
2 cups water, plus more for soaking
Sweeteners like honey, sugar, agave syrup, or maple syrup, to taste, optional

Equipment

Bowls
Strainer
Measuring cup
Blender or food processor
Fine-mesh nut bag or cheese cloth

Instructions

Soak the almonds overnight or up to 2 days.

Place the almonds in a bowl and cover with about an inch of water. They will plump as they absorb water. Let stand on the counter, covered with a cloth, overnight, or refrigerate for up to 2 days. The longer the almonds soak, the creamier the almond milk.

Drain and rinse the almonds.

Drain the almonds from their soaking water and rinse them thoroughly under cool running water. At this point, the almonds should feel a little squishy if you pinch them. (It’s best to discard the soaking water because it contains phytic acid, which inhibits the body’s ability to absorb nutrients.)

Combine the almonds and water in a blender.

Place the almonds in the blender and cover with 2 cups of water.

Blend at the highest speed for 2 minutes. 

Pulse the blender a few times to break up the almonds, then blend continuously for two minutes. The almonds should be broken down into a very fine meal and the water should be white and opaque. (If using a food processor, process for 4 minutes total, pausing to scrape down the sides halfway through.)

Strain the almonds.

Line the strainer with either the opened nut bag or cheese cloth, and place over a measuring cup. Pour the almond mixture into the strainer.

Press all the almond milk from the almond meal.

Gather the nut bag or cheese cloth around the almond meal and twist close. Squeeze and press with clean hands to extract as much almond milk as possible. You should get about 2 cups. (See Recipe Note for what to do with the leftover almond meal.)

Sweeten to taste.

Taste the almond milk, and if a sweeter drink is desired, add sweetener to taste.

Refrigerate almond milk.

Store the almond milk in sealed containers in the fridge for up to two days.

Recipe Notes

Using the leftover almond meal: The leftover almond meal can be added to oatmeal, smoothies, and muffins as it is. You can also spread it out on a baking sheet and bake it in a low oven until completely dry (2 to 3 hours). Dry almond meal can be kept frozen for several months and used in baked goods.

Source: http://www.thekitchn.com/how-to-make-almond-milk-at-home-cooking-lessons-from-the-kitchn-189996